Years ago, a customer voiced a concern about the curbless shower I built for them and the issue was perplexing.
However, the solution ended up being something that I had never heard of and is still mostly secret today.
First, let me tell you what the problem was.
Estimated reading time: 5 minutes

The Curbless Shower Problem
I went out and looked at their shower and confirmed that it wasn’t leaking or faulty. In fact, I had built this shower precisely according to the instructions and was proud of how I did it. But the issue was this:
Moisture was using the grout joints to escape outside the shower area
When using the shower, the water pressure would build up in the shower pan floor and eventually darken the grout lines immediately outside the shower area.
The moisture didn’t travel far. Maybe 1 inch past the wet area. But it was traveling underneath the glass enclosure and escaping. Even worse, I wasn’t sure how to solve the problem.
Industry Experts to the Rescue
I was attending an industry trade show the following week so I made it a point to ask some different experts in the tile industry to see if this was something they had run into.
However, almost everyone that I talked with was stumped as well.
Finally, after striking out several times, I found someone who had an intriguing solution.
A Capillary Break
They asked me if I had installed a capillary break.
I had never heard this term before let alone knew what it was.
So, they explained to me that moisture was able to travel underneath the shower glass and outside the shower because there was no capillary break installed.
Now, there is no mention of a capillary break in any instructions or industry standards related to how to build a curbless shower. But this sounded to me like it would solve the problem. So I tried it.
What is a Capillary Break in a Curbless Shower?
A capillary break is essentially a fancy, technical term for a grout joint that is filled with a flexible sealant rather than cement grout.
This flexible sealant should meet ASTM C-920. Many grout manufacturers have a 100% silicone sealant they sell that matches their grout colors and meets this standard.
Here is the technical definition according to the glossary at Building Science Corporation [1]
A hydrophobic material or non porous material (such as glass, plastic, or metal) or gap between parallel layers of material (often less than 1/16” or 1.5 mm) sufficient to stop capillary action.
Building Science Corporation
The idea behind it is that water will travel through the cement grout joint until it hits the non-absorbant silicone.
The sealant acts as a fence that keeps the moisture from crossing past it and continuing to migrate through the grout joints in the main bath floor.
How to Install a Capillary Break in a Curbless Shower Pan
Essentially, the steps are the same as what is demonstrated, with photos, in my post on how to install a movement joint in tile. But here are the basics:
How to install a capillary break in a curbless shower pan
- Build your curbless shower as you normally would
The steps to building a curbless shower are still the same.
- Grout the entire shower pan floor without getting any grout in the perimeter grout joint around the shower pan.
You want to grout as you normally would except for the perimeter grout joint around the shower pan. This needs to be kept completely clean down to the waterproofing layer.
- Install foam backer rod in the perimeter grout joint
You want to place a strip of foam backer rod all the way down to the waterproofing layer. 1/4 inch backer rod will work for most thin grout joints.
- Tape off each side of the grout joint
Apply painter’s tape to each side of the grout joint so silicone doesn’t stick to the surface of the tile
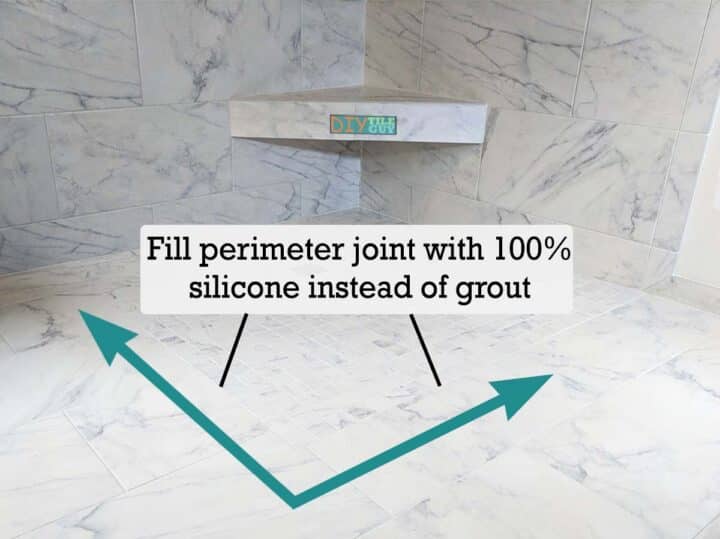
- Apply 100% silicone sealant in the grout joint
With a caulk gun, apply 100% silicone sealant in the grout joint. Usually, you can find silicone that is color-matched to the grout.
- Tool the sealant flat
Use a finger, caulk tool, or plastic credit card to tool the grout joint flat and force the sealant into the joint.
- Peel the tape
Peel up the tape on each side
- Detail as necessary
You might try a bit of denatured alcohol to do any detail work. Even applying some on the end of a finger and smoothing the silicone can help. Also, the alcohol will help clean any fresh silicone residue off of the tile and tools.
Every Curbless Shower Should Have One
You may not have this problem with every shower. In fact, there were some special circumstances that contributed to the issue my shower was having.
For example, the shower in question had a pebble shower floor which is slower to drain and has big grout joints.
But I can’t see any reason not to install a capillary break in every curbless shower that is built. Do you agree with me? Let me know in the comments.
See this post for more tips when installing a curbless shower in your home.
References
- www.buildingscience.com/glossary/capillary-break
