You want to install new tile on your floor but you’re not sure if your floor is rated for it.
Maybe you had tile previously and they were cracked and coming loose? Perhaps, you had a vinyl or carpet floor and wonder if the floor is engineered for tile?
This post will help you understand the minimum requirements for your floor and if it meets them, or not.

Estimated reading time: 10 minutes
Why you should consider the structure of your floor
Unfortunately, not every floor is designed for ceramic tile to be installed over the top of it.
Further, it would be a shame to go to all the expense and trouble of a tile floor only to have the tiles crack and come loose a year after they were installed.
Most floors will handle a ceramic tile installation. But some won’t.
Old vs new homes
You may think your house is new so it will be engineered to handle any flooring. But, this isn’t true.
Sure, some older homes won’t pass the criteria outlined later in this post.
But some of the newer ones won’t either.
Built Green
Some modern ‘green’ building practices encourage less lumber in the structure. Rather, bigger and wider cavities between studs and floor joists are considered more ideal.
However, wider spacings can cause deflection issues that are not kind to supporting tile floors.
The Plan of Attack to Assess the Structure of your Floor:
- Look at the joists and where they are supported
- Determine the spacing between the joists
- Consider the subflooring material
A quick disclaimer: This post is designed to help people understand basic industry standards for ceramic tile floors installed over a wood-framed subfloor.
The only way to know with certainty that your floor is structurally sound enough for ceramic tile flooring is to hire a qualified engineer familiar with your local building codes.
Floor joists
For starters, floor joists are underneath the plywood subfloor. They are sort of like wall studs in your floor.
Two types of floor Joists
Your floor joists are going to be one of two types. It’s important to know which type you have in your floor.
I-Joists
The I-joists are in many of the more modern homes.
They are built just like the capital letter ‘I’ with a cross on top and bottom.
I-Joists spans
Unfortunately, if you have I-joists in your floor this post won’t be able to help you assess them.
I-joists are engineered for different spans and loads and the only way to know what yours are built for is to consult a qualified engineer.
This post from the American Wood Council may be helpful in understanding I-joist spans and load capacity. [1]
Dimensional Lumber
The other type of joists you’ll find are dimensional lumber. These look like ‘normal’ lumber that you would find at the hardware store.
You can measure this type of floor joist and calculate its capabilities for supporting a tile floor.
Floor Joist Dimensions
You’ll need to measure the width and depth of the joists. Obviously, the way to do this would be to remove your existing flooring, cut a hole in the ceiling below, or crawl under your house.
You’re only concerned about the joists immediately below the floor you want to tile. Other joists in other parts of the home are not relevant to this floor.
For example: Most dimensional floor joists are going to be 1.5 inches thick and can vary in width. They may be 7.5 inches, 9 inches, 5.5 inches, or something else.
There is no standard. Measure your joists and move on to the next step.
Floor joist supports
Next, you need to figure out where your joists are supported on each end.
An exterior wall, a beam, a post, or an interior wall may support them.
You need to figure out where the joists are supported so you can measure in between those two points.
This is called the unsupported span.
Crawl space
If you are tiling the ground floor and there is a crawl space underneath the joists may be supported by the exterior foundation wall on one end and a beam in the middle.
If so, you would measure the distance between those two points.
Second floor
When the floor is on the second floor it is commonly supported by an interior wall on at least one end.
For example, a floor may be supported by an exterior wall on one end and the other end is supported by an interior ‘bearing’ wall that extends the length of the home.
The measurement in between those two points is what you need to enter into a calculator.
A qualified engineer will be able to determine which walls are supporting the floor in question.
Joist spacing
Lastly, you want to measure the spacing of your joists that are below the floor that you want to tile.
For this measurement, you want to measure from the center of the joist to the center of the joist next to it.
The most common spacing is 16 inches on-center. 24-inches is becoming more common.
Find out what your spacing is and continue onward.
Calculating the deflection of your floor joists
Now that you have your measurements, the width, height, spacing, and unsupported span of the joists, you need to run these in a calculator.
This isn’t an easy calculation but fortunately, there are several joist calculators on the internet that you can use.
The calculator I prefer is over on the John Bridge forum. I would encourage you to head over there and enter your numbers.
Below, I have an example of how to use this joist deflection calculator.
Time needed: 2 minutes
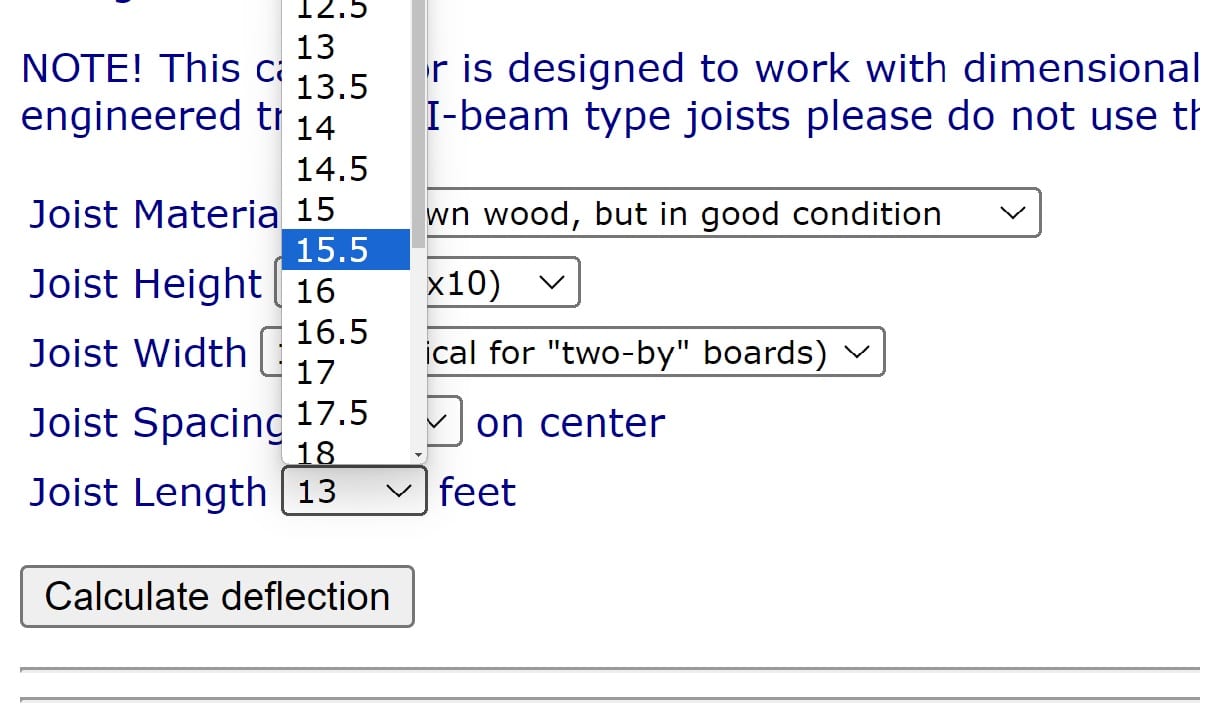
Here’s how to use the John Bridge Deflectolator:
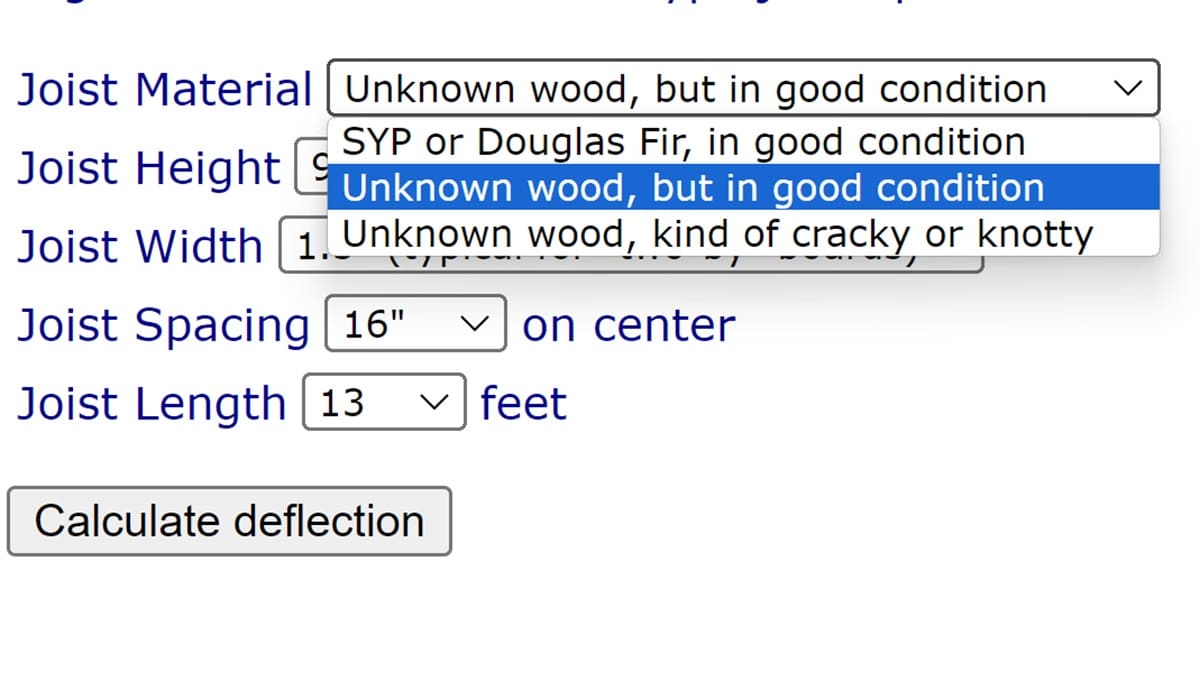
- Joist Material
You may not know the species of your lumber. That’s OK.
If you are in the Pacific Northwest there’s a good chance you have Douglas Fir joists.
If you have any doubt or are certain they are another species, just put “Unknown wood” and do your best to determine the condition (“kind of cracky or knotty”, or “good”
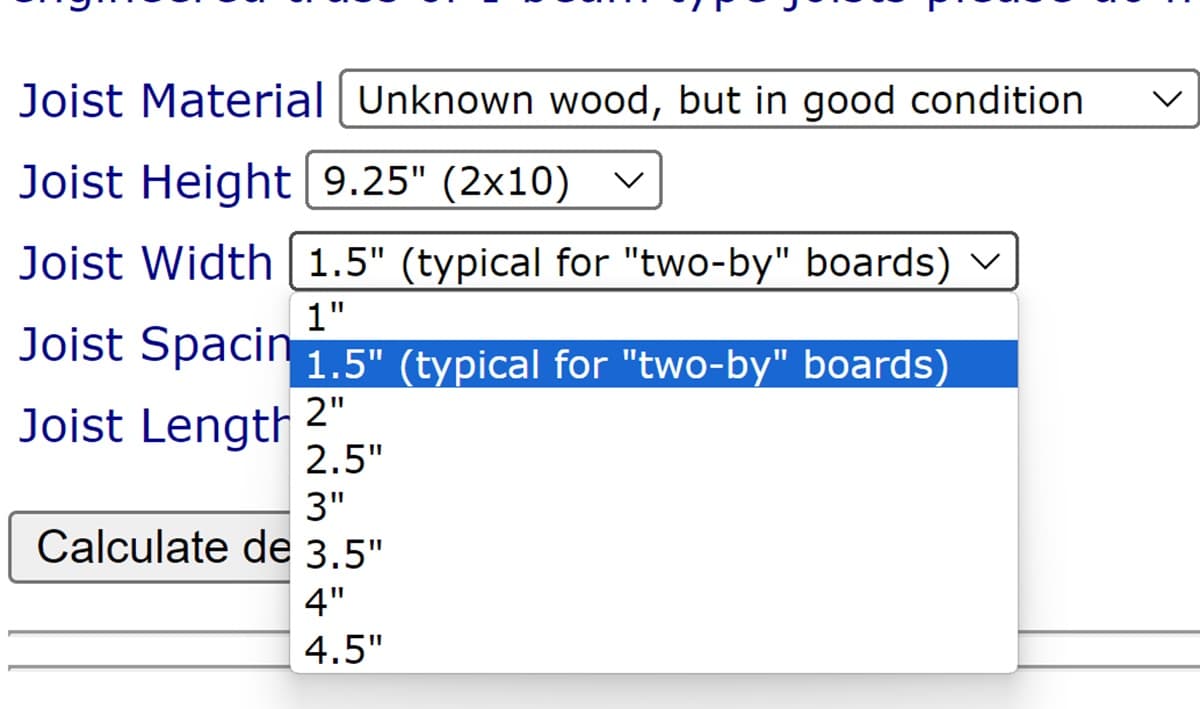
- Enter the height of the joist
It gives you 26 different options from 3.5 inches to 16 inches.

- Enter the joist width
Here you have 8 different options from 1 inch to 4.5 inches. Choose the one that most resembles your joists.

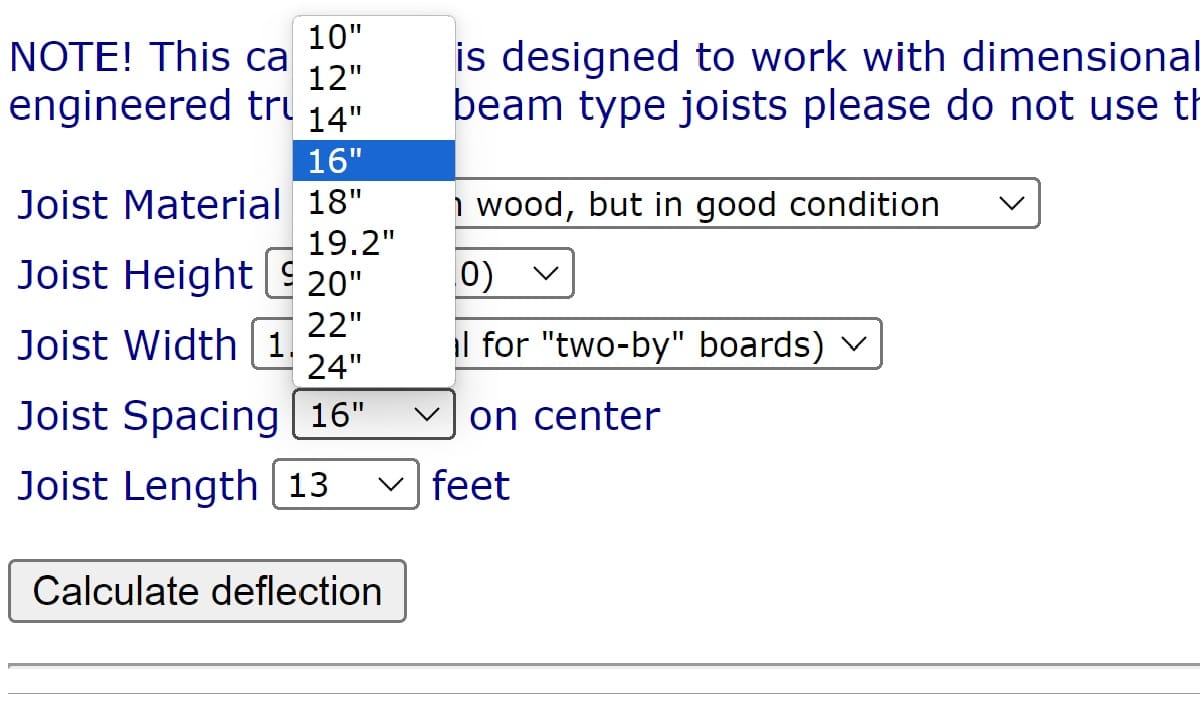
- Joist Spacing
Enter your joist spacing from the center of one joist to the center of the next. 16 inches is the most common but it’s not uncommon to have different spacings.
- Joist Length
This is where you enter the unsupported span. The actual length of the joist may be longer than this measurement.

- Calculate deflection
Press this button once you have all of the measurements entered in.

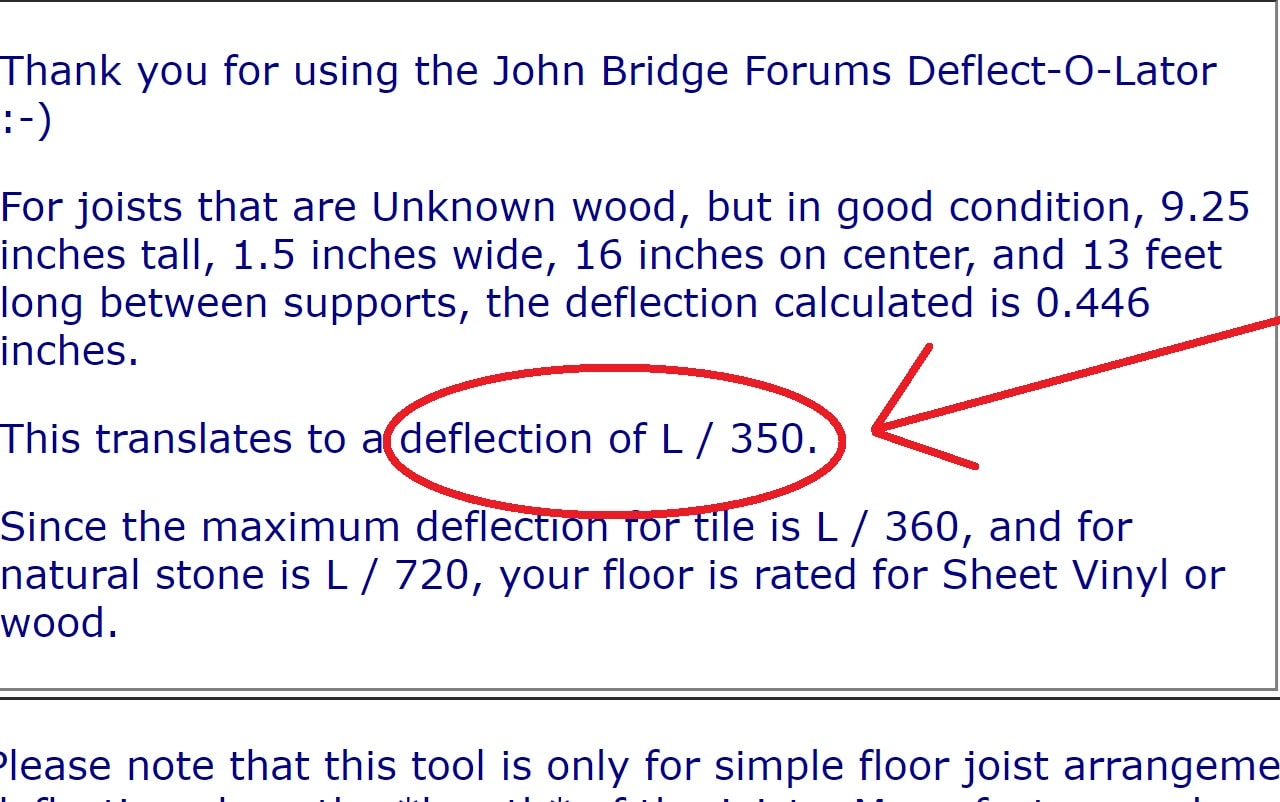
Does your floor meet L/360?
You don’t have to know what this number means but you do need to know if you exceed this number, or not.
A number larger than 360 indicates that your joists are structurally sound enough for ceramic tile flooring. [2] However, you’ll need to exceed L/720 if you are installing natural stone tiles.
A number lower than this would mean that additional measures would have to be taken if you want a tile floor. It may also indicate that you should choose another flooring option.
An example calculation of floor joist strength
Joists that are unknown wood in good condition,1.5×9.25 inches with a 12.5-foot unsupported span, and spaced 16 inches on-center come out to a measurement of L/386.
This would be good enough to consider ceramic tile flooring. Assuming, of course, that the other considerations further down in this article are met.
However, changing the unsupported span to 13 feet leads to a calculation of L/350 and would not be a good choice for tile.
Deflection In-between the joists
So, your floor joists meet or exceed defection criteria. Great! But there’s more to examine.
How much does your floor flex in between the floor joists?
This is an important consideration. Sure your floor joists may calculate to L/386 but what about when you factor in the flex in-between two joists?
Unfortunately, I’m not aware of an online calculator to determine this. It’s going to be up to someone’s judgment.
However, some factors to examine are:
- Joist spacing: the wider the spacing the more flexing
- Subfloor thickness
- Subfloor material
- Condition of subfloor: new, heavily weathered, damaged, etc.
- Seams in plywood subfloor
Your floor can meet minimum requirements on paper but may not factor in that the subfloor sat in the rain for weeks during construction or a tongue and groove seam runs right through the floor and allows additional movement.
How thick should a subfloor be for tile?
As far as this article is concerned, subfloor is another name for the plywood that covers the floor joists. Below are the two most common types you will run into along with some less common varieties.
Orient Strand Board (OSB)
OSB plywood panels are acceptable as subflooring material provided they meet ANSI standards and a minimum of 3/4 inch in thickness (23/32). Advantech is a type of OSB panel.
Plywood
Exterior grade plywood with both faces graded ‘C’ or better can be used for subflooring. Minimum thickness is 5/8 inch (19/32) and that assumes your floor joists don’t exceed 16 inches on-center.
Other subfloor materials
More rarely, you may run into wood-framed subfloors that don’t fit into the two categories listed above.
Subflooring that is too thin or wrong composition
In the past, I have run across 1/2-inch plywood subflooring. This type of subfloor is not acceptable to tile over even if your floor meets other requirements.
I’ve also seen particle board subflooring. Note: this is different than particle board underlayment you’ll find under vinyl flooring.
If you run into this, your best bet is to contact a tile underlayment manufacturer, an engineer, and/or your local building department for additional clarification on how to proceed.
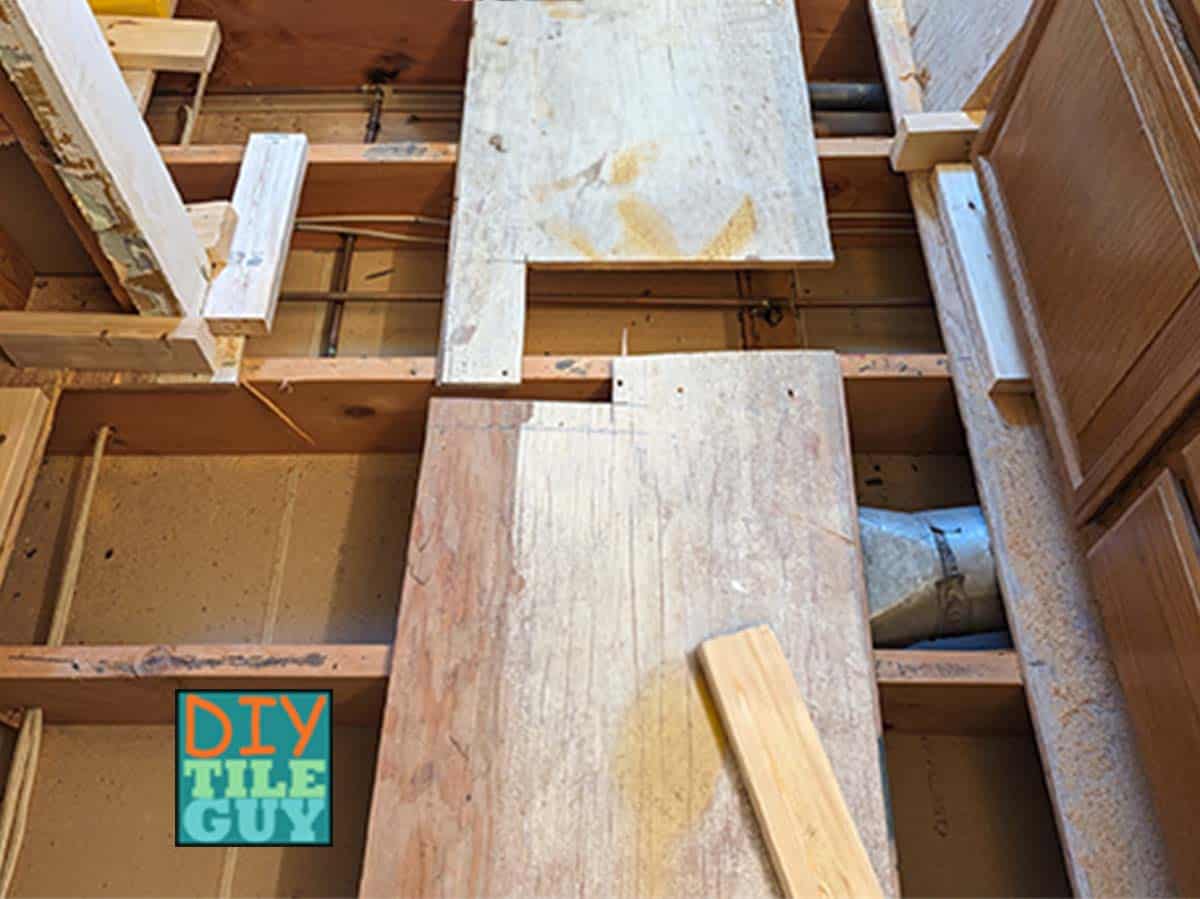
Wood plank subfloors
Wood plank subfloors are types of floors found in the western United States and typically 1.5 inch thick tongue & groove planks that run at an angle across the joists. Often, but not always, the joists are spread wider than 16-inches.
Flooring underlayments
It’s not uncommon for people to peel a vinyl floor up and think that they are down to the subfloor.
Typically, they’ve just exposed the underlayment for the vinyl which needs to be removed to get down to the subflooring layer.
Although it is possible to tile directly over the vinyl flooring, it’s not OK to install tile directly over the particle board or plywood vinyl underlayment.
This layer needs to be removed to get down to the subflooring layer.
Next Steps
Once you’ve determined that your floor is ready for ceramic tile, you’ll want to move on to selecting a tile underlayment.
You may be interested in installing Ditra or an alternative to Ditra. Maybe you prefer cement board or perhaps weighing the difference between cement board vs Ditra.
References
- American Wood Council: Tutorial for Understanding Loads and Using Span Tables
- TCNA FAQ on Deflection
Leave a Reply